Saturday, January 1, 2022

My Newest Blog, Ever....

  Hi, All,

As if I don't have enough to keep me busy with writing this blog, a model rocketry blog, and a woodworking blog, I've embarked on yet another keyboard-tickling venture that covers all of my other many and varied interests:

"Eddie's Random Ramblings"

Check it out by clicking on the link at the right under 'All Of  My Blog Pages'.

Cheers!

It's Beginning To Look A Lot Like Christmas!

(Note:  This entry was started well before Christmas.  I'm just now getting around to posting it.)

 I happen to have acquired one of last year's special sets that LEGO gave away when one purchased a certain dollar amount of product.


This is the "Charles Dickens 'A Christmas Carol'" set #40410.

The vignette features two parts separated by a wall section: an interior scene featuring minifigs of Bob Cratchit and Tiny Tim, and an outdoor section with Ebenezer Scrooge peering through the door window. All of this is built atop a well-designed, brick-built book.

One look at the set convinced me that this was a perfect candidate for LED lighting.

It's all there - a fireplace, candles, lantern, and street lamp.

An even more delightful discovery was the presence of a slide out 'secret' compartment built into the book base. 

Perfect for housing the battery and electronics.

I won't dwell too much on the set build process in favor of highlighting changes necessary for lighting installation.

My first change is this: many of the internal parts used to fashion the drawer were in earth tone colors that I would find useful in other MOCs, so I replaced them with lesser used colors (like pink) from my parts stash.


For the lighting, I started with the street lamp. The flagpole element that serves as the lamp post was replaced by a stack of black 1x1 round bricks to facilitate running wires up the center. A 3mm white LED fits nicely inside the clear lamp glass. A small hole was drilled through the plate stud on which the lamp is attached, allowing the wiring to be routed into the base below.

Some of you LEGO purists will likely wince at the thought of drilling holes in any part.  So do I, but for this build I deemed it necessary because I want no visible wiring showing in this set.  The vignette will likely never be taken apart, so a few permanently altered elements are not going to be a big deal.

Scrooge's lantern - same idea. A yellow LED was fitted inside the clear lamp element. Again, a hole was drilled through the base plate for wire routing.

Next was the fireplace.  Originally, the flames were represented by standard 'flame' elements.  In order to light up the feature, I replaced these with a trans clear orange 1x2 brick topped by a trans orange 1x1 cone and a trans orange 1x1 plate. A red LED was mounted inside the brick.  This picture comes out too bright to show the details, but in real life the fireplace looks really nice.

I made an attempt to also light up the candles atop the fireplace mantel, but I ran into an interesting problem, made apparent after modifying the fireplace side bricks and installing LEDs.  The candles illuminated, but so did the bricks that define the side of the fireplace.  Not good.

So, I removed the wiring and restored the fireplace structure to its original form.  Since I was no longer going to illuminate the candles, I removed them altogether from the build.  Perhaps in the near future, I will re-visit this problem and find a way to insulate the inside of the tan fireplace bricks so that they don't glow from inside.

Here is a picture of the electronics mounted inside the pull out 'hidden' drawer:


Each LED circuit has its own limiting resistor.  Power is from a 3.3 volt button battery wired to a miniature switch that runs everything.  All the wiring exits the back of the drawer and is routed to the various locations.

One final mod I made to the set was purely an aesthetic one.  The pine trees located on the interior and exterior of the scene were built up from small green wedge plates.  They looked cheesy.  I happened to have a couple of small pine tree elements in my 'flora and fauna' parts box that proved to be fine replacements.


Finally, here is the vignette in its full, illuminated glory:


Cheers!


Friday, December 31, 2021

Rockin' The Degobah Swamp !

 Having recently completed a build of the LEGO Ideas Stratocaster guitar set, I proudly set it up in my LEGO display cabinet.  

It happened to fit right next to the Star Wars Yoda model.  I immediately noticed that the scale between the two sets  was perfect.

Hmmmm....Why not....

Pulling both models out of the cabinet, I set to work. It was an easy task to remove Yoda's light sabre from his claw-like grasp and situate the guitar's strap around his neck.  Yoda's left hand was a bit more problematic as it was attached close to his right.  I found a work around by detaching the hand altogether and wrapping the fingers around the Strat guitar neck.  The severed hand and arm stump do not readily show as such when viewed from the front! 


So, here we are - an iconic Star Wars character playing a legendary electric guitar.

Just imagine what sort of riffing and shredding could come from a Jedi Grand Master!

I also noticed something funny - Yoda only has two fingers to use for fretting the instrument. 

This immediately reminded me of the 20th Century jazz guitarist, Django Reinhardt.  This famous musician developed a unique two-finger guitar fretting technique after losing two of his digits in a fire at the age of 18!

So now I have Yoda, his red Strat, and Fender amp all displayed as one unit.

" Find a steady gig in Mos Eisley, will I !!"


Thursday, December 30, 2021

A New Strat In The Guitar Collection

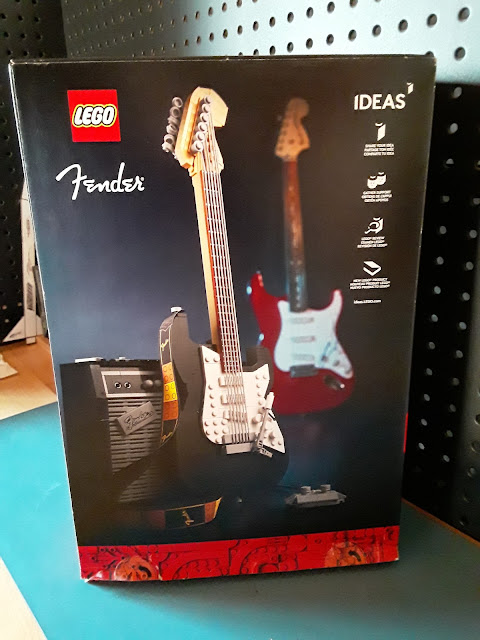
 Being a musician who owns and plays a couple of Fender Stratocaster guitars, I was delighted to receive this LEGO set as a Christmas gift:


This is LEGO Ideas set #21329

This set features a model of the iconic electric guitar model along with a Fender Princeton Reverb amplifier. Also included is a guitar stand and a stomp pedal.

1074 pieces, spread out over twelve bags, comprises the set. The guitar itself can be built in either a red or black version.

For this build, I chose red.

The first part of the build produces a functional guitar stand on which to place the completed instrument.

Next is the guitar neck, pickup section, and headstock. I was delighted to find the pre-printed tiles that represent the fretboard.  Also included is a tan slope with the pre-printed Fender logo.

Next up - installation of the strings.  These are made up of LEGO strings with attachment plates on each end. The set employs a clever technique of plugging the strings on to the back of the instrument, running them over a gear rack to the top of the guitar, then attaching them to their respective spots on the headstock. The attachment pins can be rotated to make the strings taut. Almost like the real thing.


From here, the build progresses into finishing off the guitar body, pick guards, knobs, tremolo bar, cable jack, and headstock tuners. The backside of the guitar gets a cover panel and a plate bearing a fender logo sticker. An added feature is the pre-printed Fender guitar strap.


The next bags to be opened were filled with the parts to build the Princeton amp.

This thing is highly detailed! From a loaded circuit board and tubes to the speaker and wiring.  There is even a representation of a reverb spring hidden deep in the cabinet. The outside of the amp is adorned with a proper grill and Fender logo tile, the control panel, and a carrying handle.  


The set is finished off with a stomp box with cable, and an instrument cable that connects guitar to amp.

As an even further added bonus, the set includes a large sticker with a LEGO/Fender logo suitable for putting on your full-size Strat guitar case!  How cool is that?

All in all, this is a very satisfying set - appealing to both the guitar musician and the LEGO fan.

It is quite evident that the set designers knew their way around the real thing....


Thursday, September 30, 2021

Darth Vader Helmet Build (75304)

 I've  been a bit of a slacker as of late when it comes to doing anything LEGO. 

This set has been sitting around on my desk since Father's Day, but I just had too much on my plate to get around to building it.

This past week, I finally ripped into it, completing one parts bag each consecutive evening.

This, of course, is part of the Star Wars helmet series: The 'big guy' himself -Darth Vader!

Bag 1:

This selection of parts completes the display base, the internal support structure, and the lower part of the helmet.

As with the other sets in the series, the support base features a pair of Technic beams to provide great strength to the pedestal. Without them the structure would be too weak to bear the subsequent weight of the final build, as well as its ability to handle the stresses of attaching other sub-assemblies.

Bag 2

The parts in this bag begins defining the lower sides of the helmet.

Bag 3

And, now, the grim visage of our favorite Dark Lord.  The grills on the 'nostril' section are done with stickers.  In addition, the remainder of the internal support structure is completed here.


Bag 4

The top and back of the helmet are built up here.

Bag 5

Finally, the sides and flared lower sections are built and installed.  The final step attaches the name plate.

All in all, a very enjoyable and accurate build that may just be the crown jewel of the Star Wars helmet series.

"Do not underestimate the power of the Dark Side!"


Thursday, August 12, 2021

The 2015 Americana Display, Part 13 - The United States Capitol Building

 Well, boys and girls, this is the final post of this series. I believe that this is the best build of the entire display.  The immense size and magnitude of detail is truly awe-inspiring....


Wednesday, August 11, 2021

The 2015 Americana Display, Part 12 - City Diorama

 This post features another Minifig-laden diorama encased in plexiglass.  This time it's a couple city blocks of high-rise buildings teeming with lots of raucous action.  Lots to see on every rooftop, street corner, nook, and cranny!


Phew!  LEGO Metropolitan Overload !!!