Tuesday, December 27, 2022

A Spontaneous MOC Build

My ongoing parts re-organization project (frenzy?) has been blasting full bore this past week.

I finally got to the box labeled 'Mini-Fig Accessories'.  This is a plastic compartmented box into which any and all minifig tools, weapons, hats, etc. have been tossed with very little semblance of order.

Finding that one particular tool, knight's sword, hard hat, or wizard's wand usually is an exercise in frustration when trying to pick through the mess.

Clearly, it's time to do something about it.

I happen to have a small bag containing around 50 or so 1x1 tan plates with clip that I obtained at the PAB wall a couple years ago.

 I envisioned building a wall o' bricks integrating these parts onto which I could attach a good number of the smaller minifig tools and weapons for easy viewing and access.

As this simple little project progressed, things started getting WAY more creative, and I soon found myself surrounded by many boxes and bags of LEGO parts.

I had descended hopelessly into.....

(Cue dramatic music)

...THE MOC ZONE !!!

Here is the end result...

The MOC consists of two seperate back-to-back vignettes divided by a center wall.

The first is a pirate-themed weapons arsenal including everything from medieval battle axes to light sabers.


The other side is a workshop featuring my mini-fig doppelganger.

The shop clock on the back wall is accurate twice a day!


This was a very fun build, along with being a great storage system for minifig accessories!

Cheers...


Sunday, December 25, 2022

Back Clickin' Bricks

 This past week, my wife and I binged on watching season three of LEGO Masters on Hulu.

Of course, this inspired me to break out my tubs and boxes of LEGO.

However, instead of building anything, I ended up going through the entire collection of elements and re-organizing them into a system that makes it easier for portability to anywhere in the house. 

While I had a box of orange bricks out, the creative bug took over and I ended up knocking out this little Asian-style pergola just from the parts I immediately had on hand.

When I was done, the little project got photographed, then broken down to continue the parts sorting process.

Sometimes the simple, off-the-cuff projects can be the most rewarding...


Monday, December 19, 2022

A Parts Windfall

I have some neighbors across the street that are big into LEGO building.  Around Christmas time they do their shopping at the LEGO store to pick up the latest in the larger, costlier sets that are out.  We're talking Star Wars and others.

They usually come away with some smaller freebie VIP sets and parts assortments.

The other day, the gentleman stopped by and presented me with a LEGO shopping bag that contained several of these freebies:

 Two 40515 "Pirates and Treasure" VIP Add On Packs

One  40513 "Spooky" VIP Add On Pack 

One 40411 "12 in 1" parts selection

One 30574 Cat

All told, I added well over six hundred new parts to my stash!

The best part of this new stash is that, between the Pirate and Spooky sets, I acquired 10 new skeleton minifigs!


I see these guys as forming the basis for a lot of new brick-built comics.

Of course, I have given them the collective name, "The DDC Skeleton Crew"....

Cheers!


Thursday, July 7, 2022

R2D2, Part 15 -Finally Done !!

 Bag 13 of the Artoo set literally rounds out the top of the dome. This includes the droid's little retractable 'sensor' unit.

Here is the finished build:


Also in bag 13 is the display stand and a minifig R2.

At this point, the only thing that remains is to get the electronics wired up and running.

This will entail building a small circuit board for the array of limiting resistors as well as integrating a switch system and power source.

I will be engineering this portion over the next few days.

Stay tuned...


Friday, June 24, 2022

R2D2, Part 14 - Back to Brick Clicking

 Now that the lighting is installed, it's time to get back on the actual build with bag #12.

The parts therein build up the middle level of Artoo's domed 'head'.

Gotcha: one section of the construction consisted of an internal assembly in one of the corners.

To my consternation, this interfered with some of the wiring that was already in place.

I had to do some major dis-assembly of a portion of the earlier work and do some creative substitution of parts to allow the wires to be routed around the new addition.

Should have read ahead in the set instructions.

Anyway, I got it figured out and all is well.

Ready for the 13th and final bag o' parts!

Thursday, June 23, 2022

R2D2, Part 13 - More Droid Lighting

 Today, I completed the task of wiring up the LEDs and installing them in their various spots on the model. A total of eight are required to do the job. 

I tested them all out by plugging them into my circuit breadboard. So far everything looks real cool.

The next step is to complete the final two parts bags of Artoo's dome, then start figuring out how I am going to design and build the electrical circuit board, switch system, and power supply.

Here are pics of the finished lower dome section. I had to raid my parts stash on several occasions to find alternate elements that provided holes to allow wiring to pass through, while maintaining the integrity of the exterior detailing.

A couple of the LED locations were quite challenging in this respect.


Wednesday, June 22, 2022

R2D2, Part 12 - Droid Lighting

 Today, I changed my mind and decided that this point in the build would the best place to engineer the LED lighting effects. All of the components that will receive the treatment are easily accessible.

The initial step consisted of finding the features that would be the easiest to modify, then tackle the tougher ones later.

The first parts are the two vertical openings to the left of the trans red disc.

The original parts consist of two 1x1 'lantern' elements with trans light blue 'dome' elements inserted in the back.

These trans blue are simply replaced by a pair of 3mm blue LEDS. Some 22 guage wire is soldered onto the leads prior to attaching to the model.

The LEDS are a slightly loose fit into the holes of the LEGO pieces, so a drop of CA is necessary to keep them in place.

I'm usually averse to using glue on LEGO unless it's absolutely necessary.

I'm good with it here since this set will remain assembled and on display.

It must be noted here that I am designing the lighting system on the fly. Once all of the LEDS are in their respective places on the model, I will then decide what kind of power supply I want to use, as well as a switching arrangement. A small circuit board will be built to accommodate all of the limiting resistors needed for the individual LEDs.  These resistors must be selected to not only provide protection for the LEDS, but to also set their overall brightness level.

For the time being, here is a quick functional test on one of the LEDs:

Cheers...!


Friday, June 17, 2022

R2D2, Part 11

 Today's part of the Artoo build focuses on the lower section of the droid's dome.

The section is layer-built with lots of smaller plates, bricks, and detail elements.

As I built, I paid close attention to areas where some LED illumination could be added.

There are several, and most appear to be very easy to add. 

I will likely wait until the build is completed before I tear into the lighting aspect.

Only two more bags to go....


Thursday, June 16, 2022

R2D2, Part 10

 Day 10... Parts bag 10.

This has definitely been an enjoyable build.

Here, Artoo's main body frame is completed with the construction of the back panel.


This section is very similar to the front panel, except there is much less detail.

The final steps in this part of the build include inserting some small push rods that activate the retractable tool features on the front side.

Next phase - Artoo's dome!

Wednesday, June 15, 2022

R2D2, Part 9

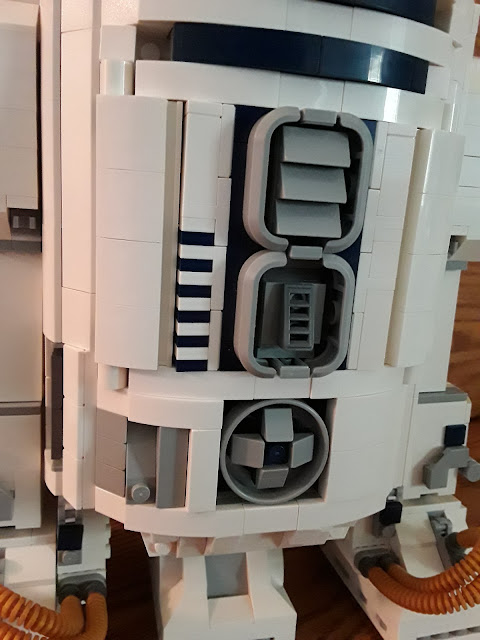
 This part of the Artoo build fills out the final details of the front panel, which then gets affixed to the main frame by a group of Technic pins.

The final assemblies to go on are the small moving panel sections that cover the droid's retractable tools.

Getting closer to completion...

Tuesday, June 14, 2022

R2D2, Part 8

 The basic frame and upper/lower detail sections of Artoo's front panel are completed with parts bag #8.

Again, basic plate, brick, and slope elements make up the assembly, with a smattering of Technic  elements to add some moving parts.

Check back tomorrow for bag #9 !

Monday, June 13, 2022

R2D2, Part 7

 The seventh bag of parts adds the final detail to the droid's outer arms. 

Both sides are identical, with no extraordinarily complicated assembly techniques.

Making progress....

Sunday, June 12, 2022

R2D2, Part 6

 Parts bag six is actually spread out over two bags. That's a substantial number of pieces for this portion of the build.

Once all the brick-clicking was finished, I found that my little mechanical friend was now equipped with a pair of detailed external 'feet'.

Again, there was nothing extraordinarily difficult with this part of the build.

Starting to look like Artoo!


Saturday, June 11, 2022

R2D2, Part 5

 The contents of set bag #5 are dedicated to building up the framework for the droid's two exterior legs.


The two assemblies are identical except for being mirror images of each other.

Consisting of mostly standard brick, plate, and SNOT elements, each features is supported and attached to the main body  with a long central Technic beam.

Once all is in place, it becomes apparent how the two outer legs and the center leg move together in relation via the intricate internal mechanical linkages.

Very cleverly designed.

Moving on...

Friday, June 10, 2022

R2D2, Part 4

 Bag(s) number 4 of the Artoo build contain predominantly plate, brick, and slope elements.


These form the two identical side panels of the droid's main body exterior.

Once built, the panels slip over the side 'leg' structures and attach to the inner frame via some Technic pins.

This portion of the assembly proved to be not extraordinarily difficult.

Moving on to bag 5....

Thursday, June 9, 2022

R2D2, Part 3 - Do Droids Have Skeletons?

 Apparently they do! 

Bag 3 of the R2D2 set builds up the same with a virtual Technic-fest of parts.

A solid framework of beams and pins are constructed which also integrate a number of internal mechanical linkages that will serve to provide the solid operation of various moving parts and gadgets.

Much of this ABS machinery is dedicated to positioning and locking Artoo's central foot into its retracted or extended positions.


Another set of mechanisms serve to activate the droid's 'torch' and 'tech arm' features.

A very fun build thus far !

Wednesday, June 8, 2022

R2D2, Part 2

 The second parts bag of the R2D2 set consists of the components to build up the droid's central 'foot'. 

There is nothing exceptionally difficult in the assembly at this stage, as all are standard plates, bricks, and slopes, with added small detail elements.

Once the foot itself is done, a long Technic beam assembly is built and attached. 

This beam then slides inside the Technic frame built from bag 1, interacting with the existing components to give the necessary forward/backward motion of Artoo's foot.

The only difficulties that could be encountered here are the proper insertion of the various Technic 'stop' pins on the beam, and orientation of moving parts. The instruction illustrations are quite crowded at this point, so the builder must pay extra attention to them.

Here is a pic of the completed assemby:

Today, I tear into bag #3...


Tuesday, June 7, 2022

R2D2, Part 1

 Ok, blog readers, it's time to jump right into this build...

Of course, the first step entails unboxing the contents and laying out the bags of parts for the usual pre-build photo.

The 2314 parts that comprise our little electrical-mechanical friend are packaged in thirteen numbered bags, along with a couple of loose Technic frame pieces.

The instruction manual contains an intriguing introduction section outlining the background history of the iconic droid, along with several Lucasfilms photos of some studio prototypes being built.

Finally, the R2D2 info sticker that goes on the model's display base is included with the manual.

Parts bag #1 is revealed to contain nearly all Technic pieces that build up the deep inner support structure of the droid. 

A small cardboard box included in the bag was found to hold a pair of rubber bands.  Hmmm.....

The parts count of this first bag was rather small, so the build took less than half an hour (at my building speed, that is).

When completed, I ended up with a brightly colored inner frame structure that featured some interesting moving elements.

Part 2 commences today....


Monday, June 6, 2022

"Beep, Beep, Bop.....Wooo-oooo!"

This weekend, I acquired a new, large set as another Father's Day gift from one of the kiddoes.

This is, of course, R2D2, set #75308.

This build of our favorite iconic Star Wars droid will be executed in my usual MO of bag-by-bag progress posts.

It just might get some LED Lighting as well.

Stay tuned...

Saturday, May 28, 2022

Imperial Light Cruiser, Part 14 - One Finishing Touch

 The ILC set did not come with any sort of a display stand, so today I raided my parts stash and cobbled together a simple plate and trans-clear brick version.

It'll do in a pinch.

The next step in the build is to retire to the basement La-BOR-atory and break out the electronic stuff to engineer a lighting scheme.

Stay tuned...

Friday, May 27, 2022

Imperial Light Cruiser, Part 13 - Down The Home Stretch

 This post covers the assembly provided by the final two bags of the set - numbers 8 and 9. These build out the hinged top section of the ship's prow.

Parts bag 8 builds out the detailed central structure and one of the slanted hull panels, and bag nine finishes up the opposite panel and top mounted gun turrets.

Here is some pics of the finally completed model:


Thursday, May 26, 2022

Imperial Light Cruiser, Part 13 - "This Is The Way...."

 After having just completed installing the parts from bag #7 onto the Imperial Light Cruiser model, I took closer notice of the small structure in the center of the bridge vignette.

This is a table-like structure with control panels that holds a red standard coffee cup element top center.

I'm not quite sure what the coffee cup is intended to represent.

Perhaps it is some sort of ship control device or communication equipment.  I'll have to go back to the last episode of The Mandalorian to see if I can figure it out.

Anyway, I definitely found the humor in having a bright red coffee cup situated so prominently in the scene.

And me being me, I just had to come up with an appropriate cartoon about it.

So, out came a couple of minifigs and the camera.....


Cheers !


Wednesday, May 25, 2022

Imperial Light Cruiser, Part 12 - Bag #7

Today's post covers the seventh bag of parts for the good Moff's spaceship model.

Focus is turned back on the forward part of the ship. The bottom angled surfaces of the hull are built up and attached to hinge elements that were put in place back in the bag -1 part of the build. The sides of these assemblies iare adorned with lots of detail elements (greebling).

Additionally, more of the fixtures and detailing are built up in the center of the bridge area.

Only two more numbered bags left to go...